
More help:
NWEA Support
Have an idea?
Share it!
Testing and Proctoring Students
Once passwords and tests are assigned, it’s time to test your kids! Students log in to testing at https://student.mapnwea.org. This page will provide more information on the testing process. What would you like to do?
Before Testing:
Starting Testing:
During Testing:
- Unlocking a student who’s locked out of testing
- Pausing or resuming a test
- Starting a test over
- Testing multiple students on the same device
Related Issues:
Preparing Students and Their Environment
Here are some final preparations to consider, after you have already completed the tasks described under Setting Up for Testing.
- Help students become familiar with their headsets
- You can also help them to practice—see Practice tests
- You can also help them to practice—see Practice tests
- Remind students not to touch the microphones or press headset buttons during the test
- Consider taping over buttons to prevent students from making adjustments
- Minimize background noise, such as open windows or loud fans
- Also avoid calling out to the class while students are testing
- In a classroom, seat students at least an arm’s length apart
- Tell students what to do when finished with testing (read a book, return to class, or something else)
See also: Testing and Proctoring Students.
Getting Students Started
Starting on a desktop or laptop computer or a Chromebook
On desktop and laptop computers and Chromebook devices, students take tests directly through the browser.
Students log in to testing at https://student.mapnwea.org.
Students will need their usernames and passwords to log in. For more information, see Assigning Passwords.
NWEA partners who roster with Clever or ClassLink can now leverage the new Student Single Sign-On (SSO) capability so that their students will not need an additional login step to access MAP Reading Fluency. This saves time for both students and teachers.
The student login option is directly available from within either Clever or ClassLink. For more information and setup instructions, review MAP Reading Fluency – Student single sign-on (SSO).
After logging in, students should select the image with the green worm that says Let’s Go, followed by the graphic that says Let's Go.
Starting on an iPad
On an iPad, students launch the MAP Reading Fluency Testing App. We suggest running the iPad app in Guided Access mode. This prevents other apps from interfering with testing and ensures students do not close the app during a timed activity. See iPad testing app for more information on the iPad app.
Beginning the test
If the Mouse Skills Check is selected, it will be presented first. The students will receive an on-screen prompt to raise their hands if they fail the check. Otherwise, students taking an Adaptive Oral Reading test will have a brief volume check before the test begins, and students assigned a Foundational Skills test will begin the test immediately.
Unlocking a student who’s locked out of testing
The Mouse Skills Check is intended to prevent students from beginning the test if they are unable to follow the directions or maneuver the mouse. If a student does not pass the check, they will be locked out of the test.

To take the Mouse Skills Check again:
Click Unlock under Need Help with Equipment to reset. The student will start from the beginning of the Mouse Skills Check after logging back in. The student can log back in immediately or after you feel that they've had enough mouse practice to try again.
To skip the Mouse Skills Check:
Open Assignments, select the student, click Edit, and clear the Include Mouse Skills Check checkbox.
Resolving Headset Issues
Students may fail the microphone check if they are speaking too loudly, too softly, at the wrong time, or not at all. Here are a few troubleshooting steps you can take:
- Confirm that the headset is the default audio device. See Setting headsets as default device.
- Tell students to use a regular speaking voice, and observe.
- If you are troubleshooting after the test was completed, you can play back the audio to evaluate what is going wrong. See Individual Student Report for directions on playing back audio.
- Make sure the mute button isn’t pressed.
- Try switching headsets.
- Make sure there aren’t loud background noises, such as an open window or a fan, being picked up by the headsets. Fans and other white noise are particularly disruptive.
- Finally, try switching computers.
Pausing and Resuming a Test
The assessment typically takes about 20 minutes and can be completed in one sitting. If students need to take a break or stop for the day, three options are available:
1. Screens with a Pause Button
Press the red pause button that appears on certain instruction screens. It appears before all timed subtests. However, it does not appear after students have reached the oral reading passage section.

2. Screens with a Continue Button
The green Continue button appears before some sections of the test. If you want to pause, do not click the green button. The test will pause until the button is clicked.

3. All Other Screens
Press the Esc key to exit full-screen mode, then close the browser window to automatically pause the test. When a student logs back in, content will be presented starting from the beginning of the last unscored activity. If you plan to have a student resume testing at another time, try to exit the test at one of the natural stopping places listed above.
In-progress tests that have been paused (actively or by default, such as during a power failure) will resume automatically when the student logs back in.
Starting a Test Over
Tests that have been completed cannot be deleted. Tests that have not been completed can be discarded. You can start over to discard any in-progress test results. For example, you may want to do this if you discover that a student is having issues with their headset or if the student hasn't been on-task during the timed portions of the test. From the Proctor Dashboard, find the student’s name under In-Progress Tests and click Start Over:
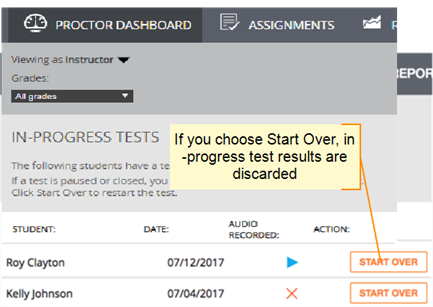
Note: The system maintains only one active session at a time, which means you cannot keep one session paused while you start another test for the same student.
Testing Multiple Students on the Same Device
In school environments, student accounts are often configured to forget settings upon logging out of the device. If possible, keep the devices used to test students logged in to the student account between different student users.
Logging out of the device may cause the Chrome browser to no longer be authorized to use the microphone. Make sure to allow Chrome to use the microphone before student testing by conducting a hardware check—see Performing a hardware check. You can check in the address bar on the Reading Fluency website whether Chrome is authorized to use the microphone. If it is not, allow it from the address bar or conduct another hardware check so that the prompt will authorize microphone use.
To change microphone settings using the address bar:
- Click on the padlock next to the word Secure in the address bar.
-
Click on Site Settings.
Make sure that the drop-down list next to Microphone is set to Allow. If it isn’t, choose Always allow on this site.

To change microphone settings on an iPad:
Select the Check Equipment link in the MAP Reading Fluency Testing App. This will prompt you to allow the microphone if it has not been allowed. See iPad testing app for more information on the app.