More help:
NWEA Support
Have an idea?
Share it!
Import Your Roster
Before you can import, you must prepare a roster file (see Prepare Your Roster).
Use the following video for detailed import instructions and error troubleshooting. For an additional reference, see Import Errors Guidance.
Timing Tips:
- Coordinate at the district level because you can run only one import process at a time within a district.
- During peak testing times, the import puts requests into a queue, which may take up to 48 hours.
- If needed, you can break the import file into small batches instead of one large file.
- To prevent conflicts, inform all users when an import is in progress so they avoid updating user profiles.
Walk Through the Import Steps:
Required role: Data Administrator
About the Import Options
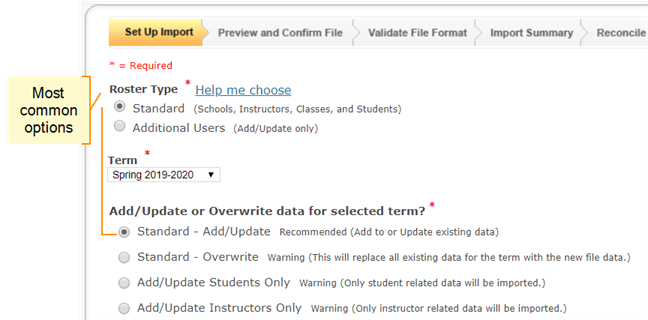
In almost all cases, you’ll use the following options on the Import Profiles page:

-
Roster Type Standard—Specifies that you are importing the Standard Roster template.
(For information about the Additional Users template, see Add Staff and Roles in Roster Import.)
- Term—Typically, you keep the default, current term.
- Standard—Add/Update—Imports both students and teachers, and updates information for anyone previously imported.
Other import options
Warning: All of these options could result in students failing to appear on reports or teachers failing to have access to reports. Use caution and be prepared to possibly correct the situation with another roster import.
| Option | Result | Example Use |
|---|---|---|
|
Standard - Overwrite |
Overwrites both student and teacher information for a specified term. The overwrite not only adds and updates, but also removes existing information. For every school that appears in your roster file, the overwrite starts by removing existing information from the The overwrite does not affect:
|
You can both remove and replace incorrect information, such as students accidentally assigned to the wrong grade or imported to the wrong term. Be sure your roster file includes all students and classes you want enrolled for the target term and school. For example, you might need to correct only grade 3 students. Your roster should also include students from all other grades to keep them enrolled for the term. If you do not, then you would need to repeat the roster for those missing students to add them back. |
|
Add/Update Students Only |
Only imports student data, not teachers and not class assignments. Because this option excludes class assignments, any students you add will fail to appear on |
You can quickly add students if you have an urgent need to begin testing before your full roster information is complete. You could also use this option to correct information for existing students. Be sure to import the full roster soon after using the Students Only option. If you do not, then any students you added will not appear on reports because they do not have class associations. (Students you updated will retain their current classes.) |
|
Add/Update Instructors Only |
Only imports teacher data (found in the Instructor columns), but not students and not class assignments. Because this option excludes class assignments, any teachers you add will fail to have access to reports. |
You can quickly provide teachers with access to the Be sure to import the full roster soon after using the Instructors Only option. If you do not, then any teachers you added will not have access to reports because they do not have class associations. (Teachers you updated will retain their current classes.)
|