More help:
NWEA Support
Have an idea?
Share it!
Syncing Programs to MAP Using Clever
Syncing Clever with your MAP system will enable data to transfer accurately between the two systems and enable you to analyze MAP assessment data associated with students in specific programs.
By default, Clever supports several fields that NWEA will import to MAP as programs: ell_status, frl_status, and iep_status. To sync other programs, you can create custom fields (also known as “extension” fields) in Clever that you can then share to MAP.
These instructions will walk you through the process of setting up your Clever program data to import correctly into MAP.
Step 1: Find the MAP Custom Names for the programs you will sync
When Clever sends program data to MAP (e.g., if a student is an English Language Learner [ELL]), the MAP system will attempt to import the data using the MAP Custom Names for the programs you’ve defined. Therefore, a good first step is to identify the MAP Custom Names that are already entered the MAP system (if any).
To find the MAP Custom Names for the programs in your district:
-
Log in to MAP at start.mapnwea.org.
-
Select Manage Preferences in the header (only available to users with MAP role of System Administrator or District Assessment Coordinator).
-
Select Modify MAP District.
-
Scroll down to the Programs section. A list of programs showing the NWEA Standard Name and MAP Custom Name appears.
-
Note the Custom Names for programs you want to sync using Clever.
-
The MAP Standard Name is not used to match program data from Clever.
-
The MAP Custom Name is the name that shows on MAP Growth reports.
-
It is possible for multiple MAP Custom Names to have the same MAP Standard Name, and it is also possible for the Custom Name to be identical to the MAP Standard Name.
-
Individualized Education Plan (IEP) is not a default value in the MAP System and, therefore, will need to be added if you want this program data to sync. These steps include:
-
On the start page, select Manage Preferences in the header. Then select Modify MAP District (requires MAP role of System Administrator or District Assessment Coordinator).
-
Select the Add Program button, then select “Other” as the Standard Name and paste "Individualized Education Plan (IEP)” into the Custom Name text field.
- Finally, select Submit to save.
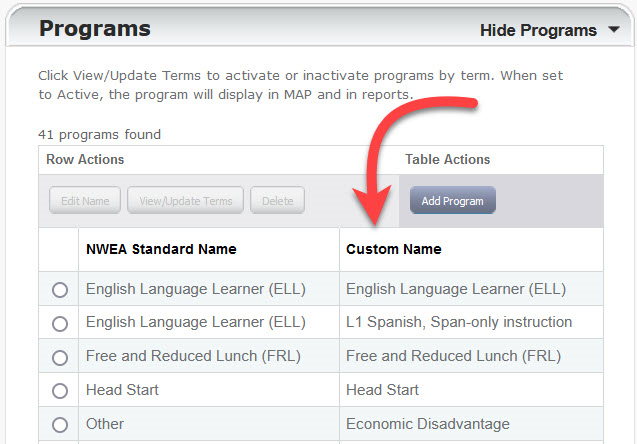
NWEA standard program names and corresponding MAP custom names.
-
Step 2: Learn about Clever Standard Fields
Clever has 3 standard fields that are pre-populated in the Clever system.
-
ell_status
-
frl_status
-
iep_status
These 3 Clever standard fields, if shared with the MAP System, will automatically link up with the following MAP Custom Names if the MAP Custom Names are present in your MAP system (refer to the table below).
| Clever Field Name | Clever Accepted Values | MAP Standard Name | Corresponding MAP Custom Name |
|---|---|---|---|
| ell_status | Y/N or empty | English Language Learner (ELL) | English Language Learner (ELL) |
| iep_status | Y/N or empty | Other - or - Special Education (SPED) | Individualized Education Plan (IEP) |
| frl_status | Free, Paid, or Reduced | Free and Reduced Lunch (FRL) | Free and Reduced Lunch (FRL) |
Table 1 provides an overview of values in Clever and what you would see in the MAP System under Manage Preferences > Modify District.
For additional programs or if your programs have different MAP Custom Names than listed in Table 1, continue to the next step.
Step 3: Identify if you need to modify or create new extension fields in Clever
Now that you understand that Clever has 3 default fields that align with a small handful of common school programs, you can determine if you need to add or modify extension fields in Clever in order to identify additional programs in your school (e.g., Talented and Gifted, After School Classes, etc.). The easiest way to do this is to compare the extension fields in Clever to the list of MAP Custom names.
-
If the extension fields in Clever perfectly match (including spelling and punctuation) the list of MAP Custom names, then no action is needed and your data should transfer accurately.
-
If you have extension fields in Clever (e.g., Talented and Gifted) that are not on the list of MAP Custom names, you will need to create new MAP Custom names to match these extension fields.
-
If you have MAP Custom Names (e.g., After School Classes) that do not have a matching Clever extension field, you will need to create new (or modify a current) extension field to match the MAP Custom Name.
Important Note: The MAP Custom Name must exactly match (spelling and punctuation) the Clever extension field for the two systems to communicate accurately.
Step 4: Creating new extension fields in Clever
You can create new extension fields in Clever by uploading a custom CSV file called “students_ext.csv” to your Clever system. For step-by-step instructions on how to create your CSV file, please review Clever’s web page.
The following figure is an example of what the CSV file should look once you’re done.

Example CSV File
-
Across the top of the CSV file, you can see that the column headings are the Clever extension field names.
-
The first column of information contains the Student Information System (SIS) ID for each student. You will need to enter this information in your CSV file. To find this information, log in to Clever and follow these steps:
-
First, select Data browser (left panel)
-
Next, navigate to the Students tab
-
Choose a Student and then select Details
Tip: From the data browser, and on the Students tab, you can download all student records in a CSV file which would then display Student ID field sis_id.
-
-
The data inserted into the rest of the cells helps identify which students are in which school programs. For example, the student with ID “S7-1” is in the Head Start program. The student with ID “S7-12” is in the Special Education (SPED) program. You will need to enter this information in your CSV file.
-
The last column of information contains programs (also known as Custom Names) that do not have a corresponding extension field and, therefore, should be listed under ext.other field. Note that for this column, you can assign students to multiple programs by including a comma ( , ) after each program (for reference, see the figure, depicting how your CSV file should be set up). When NWEA imports this data from Clever into MAP, the student will be assigned to both programs, as long as the Custom Names on your CSV file and on MAP System match exactly.
The names of the Clever extension fields that the MAP system accepts are listed in the MAP Custom Name column in the table below. The data you will enter in the CSV file to assign a particular student to a program will be the exact Custom Name of the program you have listed in the MAP system.
| Clever Extension Field Name (Column headings in CSV file) | Clever Accepted Values | MAP Standard Name | MAP Custom Name (Clever Accepted Values) (Value listed as the Custom Name in MAP) |
|---|---|---|---|
| ext.head_start | Custom Name listed in MAP | Head Start | Head Start or Custom Value of your choosing |
| ext.section_504 | Custom Name listed in MAP | Section 504 | Section 504 or Custom Value of your choosing |
| ext.special_education | Custom Name listed in MAP | Special Education (SPED) | Special Education (SPED) or Custom Value of your choosing |
| ext.talented_gifted | Custom Name listed in MAP | Talented and Gifted (TAG) | Talented and Gifted (TAG) or Custom Value of your choosing |
| ext.title1 | Custom Name listed in MAP | Title 1 | Title 1 or Custom Value of your choosing |
| ext.frl | Custom Name listed in MAP | Free and Reduced Lunch (FRL) | Custom Value of your choosing |
| ext.ell | Custom Name listed in MAP | English Language Learner (ELL) | Custom Value of your choosing |
| ext.iep | Custom Name listed in MAP | Other | Custom Value of your choosing |
| ext.other | Custom Name listed in MAP | Other | Custom Value(s) of your choosing *use commas to separate multiple values |
What if I have multiple “other” programs?
NWEA will assign programs based on the Custom Name of the program. For example, a district might have a program with a Custom Name in MAP called “Volleyball” and another program with a Custom Name called “Economically Disadvantaged”. Refer to the figure below, which depicts the NWEA Standard Names and their corresponding Custom Names, in the MAP System.

NWEA standard name to custom name
What if I have multiple programs that might match a different custom field name (such as ELL)?
If no students will ever be assigned to both programs (for example, a district might have “ELL Spanish” and “ELL Arabic” programs and students can only ever be assigned to 1 of these), then you can use the same custom field in Clever for both. The student assigned to, for example, ELL Spanish, should have “ELL Spanish” as the value for the ext.ell field, while the student assigned to ELL Arabic will have “ELL Arabic” in that field.
The only field that NWEA will accept multiple values for the same student is ext.other. So, if there is a chance that a student could be assigned to multiple programs with the same custom field name in Clever, you should use another field, such as the ext.other field for these programs instead. The ext.other field will accept comma-separated values.
Step 5: Sync data to Clever
For instructions on how to add custom fields and assign values to students in Clever, follow the steps in this Clever help article: For District Admins: Syncing custom (i.e., extension) fields to Clever. The linked article describes:
-
How to upload custom data (using the students_ext file) manually to Clever
-
How to upload custom data via your district’s SFTP and SIS-managed auto-sync with Clever
-
How to view and manage the custom field data in Clever
If you need help syncing the data from your SIS into Clever in the correct format, contact Clever technical support.
See the table below for an example students_ext file where multiple students are assigned to different programs.
| sis_id | ext.other | ext.section_504 | ext.talented_gifted |
|---|---|---|---|
| 123 | Remote Learning | Gifted and Talented | |
| 456 | Remote Learning | Section 504 | |
| 789 |
Remote Learning Economically Disadvantaged |
In the above table, notice that:
-
Student 123 will be assigned to 2 programs in MAP: the Remote Learning program and the Gifted and Talented program.
-
Student 456 will also be assigned to the Remote Learning program as well as the Section 504 program.
-
Student 789 is assigned to both the “Remote Learning” and “Economically Disadvantaged” programs.
Note that all of these programs are matched based on the Custom Name in MAP. The NWEA Standard Name field is not considered.
Step 6: Share data with NWEA
Now that the data is synced to Clever, you can share the data with NWEA. The instructions for sharing custom fields in Clever with an application partner are at the bottom of the For District Admins: Syncing custom (i.e., extension) fields to Clever on Clever’s Help center site. Look for the Sharing custom fields with apps section. If you are sharing sensitive fields, refer to For District Admins: Syncing Sensitive Fields (i.e., ELL status, IEP status, FRL status).
Since these fields are considered sensitive, you must provide special permission for Clever to share these fields with MAP. Refer to For District Admins: Syncing Sensitive Fields (i.e., ELL status, IEP status, FRL status) for instructions.