More help:
NWEA Support
Have an idea?
Share it!
Assigning Passwords
Before students test for the first time, they need usernames and passwords assigned. Once assigned, the passwords remain set, but anyone can change passwords as needed.
There are two tasks that you should do together:
Watch the following video for a demonstration:
Note: Since MAP Skills has been retired, the overlapping user names and passwords across products will no longer be relevant.
About Student Usernames and Passwords
Student usernames are typically assigned when your school or district imports your student roster at the beginning of the school year. After assigning it once, usernames do not need to be reassigned for subsequent terms.
If students are added with the username left blank, they will receive automatically generated usernames. However, the auto‑generated username may be difficult to type, so the better practice is for your school or district to specify usernames when preparing the roster.
You cannot edit student usernames in MAP Reading Fluency—only passwords. If you need to change usernames, contact a leader with the Data Administrator role. They can assign the username for a group of students or individuals.
Changing Passwords
The Student Passwords tab is available to all roles, but you are limited to certain groups of students. See Accessing MAP Reading Fluency. Your passwords can be:
- the same for all students
- unique for each student
- custom or auto-generated
Important: As soon as you change passwords, you should continue to Printing Passwords.
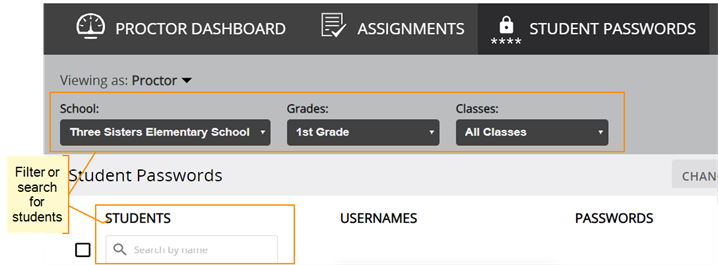
To search or filter students:
As needed, use the filter menus or the search box to display the right group of students:

If you do not see your students or if you need usernames changed, contact a leader with the Data Administrator role.
To set passwords for multiple students:
-
Select any combination of students or click the top checkbox to select all students displayed.
- Click Change Passwords.
- Choose from the options that appear:
- Assign same password: Applies whatever you type to all selected students
- Generate: Automatically creates unique 4-character words for each student selected
-
IMPORTANT: Print or copy the passwords before you leave this tab.
When you leave this tab or change the list of students, the passwords become hidden. You cannot see or print the passwords, unless you change them again.
To set a password for an individual student:
-
Click on the asterisks and type a password:

- Click the check mark to save or the "X" to cancel.
-
IMPORTANT: Print or copy the passwords before you leave this tab.
When you leave this tab or change the list of students, the passwords become hidden. You cannot see or print the passwords, unless you change them again.
If you changed passwords by mistake:
You cannot reverse a password change once you confirm it. However, you can reassign prior passwords if needed.
Printing Passwords
Printing must immediately follow changing passwords in order to see them appear. Until you change passwords, the Print button shows an alert (!) as a reminder. If you later try to print or reprint passwords, you will only see asterisks because they are hidden. Passwords will only appear if you change them again.
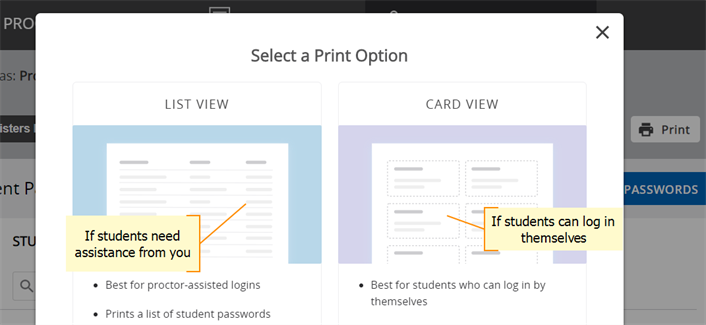
After you click Print, choose either print option (List View or Card View) that best meets the needs of your students:
