More help:
NWEA Support
Have an idea?
Share it!
Prepare Your Roster
A roster spreadsheet is required for importing staff and students.
The purpose of roster preparation goes beyond testing. The way you put together the roster also determines the organization and access for reports. It groups students into classes, and connects those classes to any educators who need to access the students’
Use the following video to complete your roster, and then import it (see Import Your Roster ).
Walk Through the Preparation Steps:
Note: Elements of the interface have been updated over time, so your screens may not exactly match the screens featured in this video. For details about navigating from the Start page, visit Start Page Overview.
About the Roster Templates
You create your roster file using NWEA templates.
To download NWEA Templates:
-
From the start page main menu, choose Rostering and then select Import Profiles/Rostering.
-
Select Access NWEA Legacy Rostering to access the Set Up Import screen on the Import Profiles/Rostering page.
-
Under Download Templates, choose the following templates (requires MAP role of Data Administrator or System Administrator):
- Download MAP Roster File Template—Primary template with two spreadsheet tabs:
- StandardRoster tab—Main template for inputting teachers, students, and classes.
- Additional Users tab—Optional template to input additional staff or to add other roles to teachers (teachers only receive the Instructor role by default). For details, see Add Staff and Roles in Roster Import.
- Download MAP Programs File Template—Optional template to set up and report on students participating in programs. See Setting Up Student Programs for Reports.
Saving Roster as CSV Format
After preparing the roster file, you need to save it as the comma-separated (CSV) format before you continue with the roster import.
Note: If you are using Excel®, avoid saving your CSV file(s) as a format variation like CSV UTF-8; however, if you are using a program other than Excel (such as Numbers® or Google Sheets™), you may need to save your CSV file(s) using a CSV format variation.
Alternative: Saving CSV outside United States
If you operate in a region outside the United States, you might need to adjust settings so your CSV file uses commas to separate information, instead of semicolons. First check whether this situation applies to you:
- For Excel or Numbers—Check the format of decimal numbers. Does it use a comma, such as “0,5” to represent the number one‑half? If so, then follow these instructions.
- For Google sheets—You do not need to follow these instructions.
Depending on your situation, follow instructions for option A, B, or C. Later, after importing the roster and fixing any errors, you can restore the original settings.
Option A: Using Excel on Windows
- As a precaution, close Excel if it is open.
- Open the Control Panel:
- On Windows 7: Choose Start > Control Panel.
- On Windows 10: Type “control panel” in the search box of the Windows Task bar.
- Open the region settings:
- On Windows 7: Choose Clock, Language, and Region > Change keyboard or other input methods (or click the Region and Language icon).
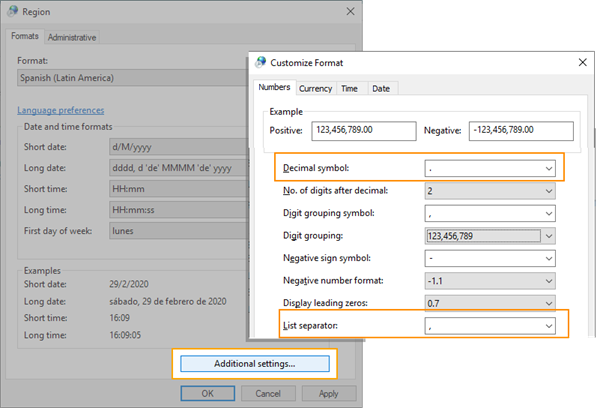
- On Windows 10: Under Clock and Region, click Change date, time, or number formats.
- Under the Formats tab, click Additional Settings.
- Make the following changes and click OK:
- Decimal symbol—Change to “.” (period).
List separator—Change to “,” (comma).

- Restart Excel.
-
Open your roster spreadsheet and save as the comma-separated (CSV) format, avoiding format variations like CSV UTF-8.
Option B: Using Excel on a Mac
- As a precaution, close Excel if it is open.
- Open the System Preferences, available from the Apple icon.
- Choose Language & Region.
- Click Advanced.
- Make the following changes for the Number separators:
- Grouping—Change to “,” (comma).
Decimal—Change to “.” (period).

- Restart Excel.
- Open your roster spreadsheet and save as the comma-separated (CSV) format, avoiding format variations like CSV UTF-8.
Option C: Using Numbers on a Mac
- In Numbers, close the roster template if it is open.
- Choose File > Advanced > Language & Region.
- Change Region to United States.
- Open your roster spreadsheet
- Choose File > Export To > CSV.